First, decide which audio you actually need
"Record with audio" can mean three different things, and every tool handles them differently:
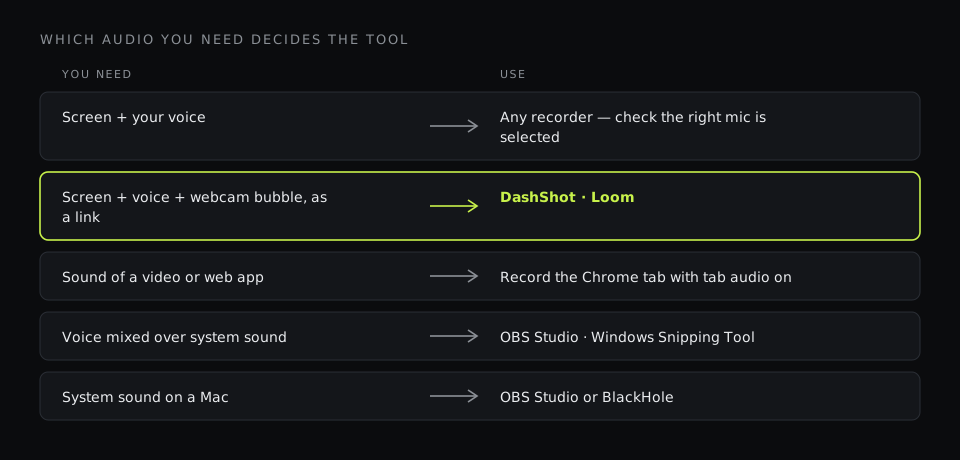
- Your voice (microphone) — narration, explaining what you're doing. This is what 90% of work recordings need: bug reports, client updates, walkthroughs.
- System audio (computer sound) — the sound coming out of your computer: a video you're demonstrating, a notification sound in an app, the other side of a call.
- Both mixed together — you commenting over a video or a demo with sound. This is the hardest case and where built-in tools fall short most often.
Add a webcam on top and you have the classic "Loom-style" recording: your screen, your voice, and your face in a small circle in the corner. Here's how to get each piece on every platform.
On Windows
Snipping Tool (Windows 11)
The Snipping Tool now records video, not just screenshots. Open it (or press Win+Shift+R on recent versions), switch to the video mode, select the area, and before you press Start, check the two audio toggles: microphone and system audio. You can turn on either or both. There's no webcam overlay, and the result is an MP4 file saved to your Videos folder.
Xbox Game Bar
Press Win+G, find the Capture widget and press record — or use Win+Alt+R to start and stop directly. System audio is recorded by default; toggle the microphone with Win+Alt+M. The catch: Game Bar records a single app window, not the desktop, File Explorer or several windows at once, and it has no webcam overlay. It's built for games, and it shows.
Clipchamp
Clipchamp ships with Windows 11 and has a Record & create option with a "screen and camera" mode — the simplest built-in way on Windows to get your screen and your webcam in the same video, with your microphone. The recording lands in the Clipchamp editor, where you can trim it and export.
On a Mac
Screenshot toolbar (Cmd+Shift+5)
Press Cmd+Shift+5, choose "Record Entire Screen" or "Record Selected Portion", then open Options and pick your microphone under "Microphone". Press Record; stop from the menu bar icon. That gets you screen plus voice.
System audio is the problem on a Mac. macOS's built-in recorder doesn't capture the computer's own sound. To include it, you need either a recorder that supports it (OBS Studio does on recent macOS versions) or a virtual audio device such as BlackHole that routes system sound into a recording input.
Webcam on a Mac without extra apps
Open QuickTime Player, choose File → New Movie Recording, and you'll see your camera in a window. Shrink the window, put it in a corner, and select View → Float on Top. Now start your screen recording with Cmd+Shift+5 — the camera window is part of the screen, so it ends up in the video. It works, but it's a rectangle rather than a bubble, and you have to set it up every time.
In Chrome (any computer)
Browser-based recorders use Chrome's own screen-sharing dialog, and that dialog decides what sound you get:
- Share a Chrome tab and tick Also share tab audio — you get the sound of that tab on any OS.
- Share your entire screen on Windows or ChromeOS and tick Also share system audio — you get all computer sound.
- On a Mac, Chrome can share tab audio but not system-wide audio.
- Your microphone is a separate permission the recorder asks for.
So for recording a video or a web app with sound, the most reliable cross-platform trick is: open it in a Chrome tab and record that tab with tab audio on.
With DashShot: screen, voice and a camera bubble in one click
DashShot is our product, so here's exactly what it does and doesn't do with sound. In the desktop app (macOS and Windows) and the Chrome extension, you:
- Start a recording — Ctrl/Cmd+Shift+R in the extension, or the recording hotkey in the desktop app.
- Pick what to record: the full screen, a single window, or drag out a region.
- Turn on the microphone and choose which one, if you have several. A 3-second countdown gives you time to get ready.
- Turn on the camera — a mirrored circle appears in the corner with a live preview, so you see how you look before recording starts.
- Record, pause if you need to, stop. Cut out mistakes anywhere in the video, then copy the link.
What to know about audio: the desktop app records your microphone. The Chrome extension records your microphone, or — with the microphone off — the tab or system audio that Chrome's sharing dialog provides; it doesn't mix both into one track. If you need your voice mixed over a video's sound, OBS Studio is the right tool. DashShot's free plan records up to 5 minutes per video with no watermark; Pro ($8 per user per month, billed annually) removes the limit. Screenshots are free.
When you need everything: OBS Studio
OBS is free and records any mix of sources: screen, windows, webcam, microphone and desktop audio, each with its own volume slider and filters such as noise suppression. Add a "Display Capture", an "Audio Input Capture" for the mic, an "Audio Output Capture" (or the built-in "Desktop Audio") for computer sound, and a "Video Capture Device" for the webcam — then crop the webcam into a corner. It takes ten minutes to set up the first time and then just works, with no time limit or watermark. What you don't get is a link: the result is a file you upload yourself.
Which method to use
| Tool | Microphone | System audio | Webcam bubble | Share link |
|---|---|---|---|---|
| Snipping Tool (Win 11) | Yes | Yes | No | No |
| Xbox Game Bar | Yes | Yes | No | No |
| Clipchamp | Yes | Via the sharing dialog | Yes | Via export |
| Mac Cmd+Shift+5 | Yes | No (needs BlackHole) | QuickTime trick | No |
| DashShot | Yes | Tab/system in Chrome, without mic | Yes, with preview | Yes, instant |
| OBS Studio | Yes | Yes, mixed | Yes, manual setup | No |
Before you hit record: a 30-second sound check
- Pick the right microphone. Laptops often default to the built-in mic even when a headset is plugged in. Choose it explicitly in the recorder.
- Record 5 seconds and play them back. It's the only way to know the sound is there. Most "silent" recordings are a muted or wrong input.
- Use headphones if you record system audio and your voice. Otherwise the microphone picks up the speakers and you get an echo.
- Close notification-heavy apps. Slack pings and email chimes end up in the recording when system audio is on.
- Keep the mic close and steady. A headset or a clip-on mic beats a laptop microphone a metre away in a room with bare walls.
Webcam tips that make recordings feel more personal
- Put the bubble where nothing important is — usually the bottom-right corner, away from buttons and menus you'll click.
- Light your face from the front. A window behind you turns you into a silhouette.
- Look at the camera at the start and the end. It's what makes a recording feel like a message rather than a screencast.
- Turn the camera off for long technical walkthroughs. For a 30-second update, the face helps; for a 10-minute bug investigation, it's just covering part of the screen.